In Unity, a sprite sheet is a single image file that contains multiple smaller graphics (sprites), often used for 2D animation, character states, or tilemaps. It helps improve performance and makes organizing related sprites easier.
✅ Common Use Cases:
- Character animation (walk / run / jump frames)
- Environment tiles (grass, bricks, water, etc.)
- UI elements (buttons, icons)
✅ How to Get and Import a Free Sprite Sheet
In this tutorial, we use a free asset from the Unity Asset Store: Warrior Free Asset | 2D Characters | Unity Asset Store
🧩 Steps to Add the Asset:
- Open the asset’s page and click “Add to My Assets.”
- Launch the project via Unity Hub — this will open the Unity Package Manager.
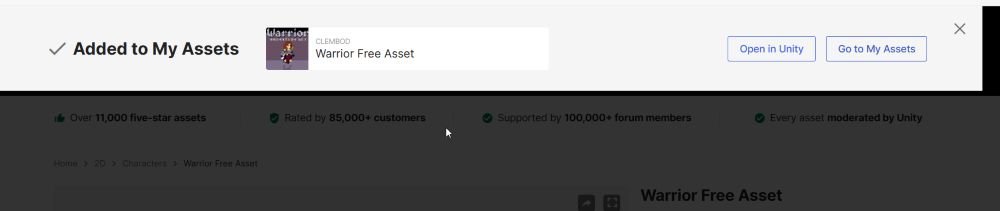
In the Package Manager, select the asset, then click Download and Import:

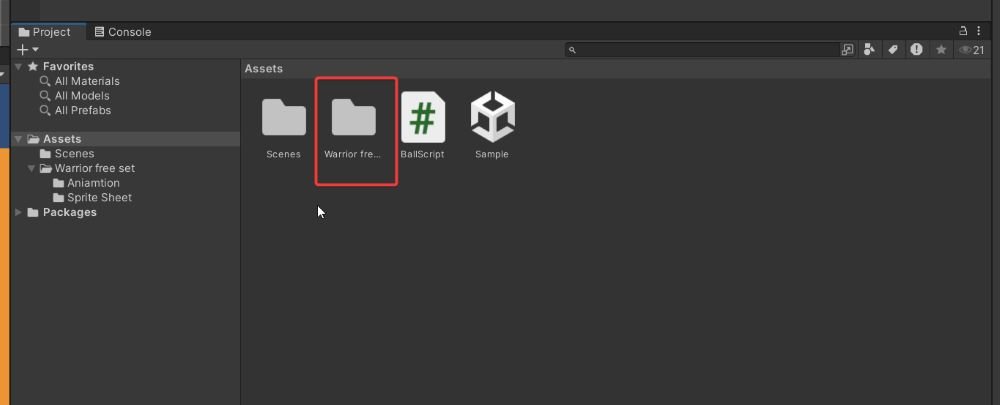
The imported Assets will be shown in the project window:
🧰 How to Use a Sprite Sheet in Unity:
- Import the Sprite Sheet:
- Drag your image into the Unity Assets folder.
- Set the Texture Type:
- Select the image.
- In the Inspector, set Texture Type to
Sprite (2D and UI).
- Set Sprite Mode:
- Change Sprite Mode to
Multiple(instead ofSingle).
- Change Sprite Mode to
- Open Sprite Editor:
- Click the Sprite Editor button.
- Use the Slice tool to divide the sheet into individual sprites.
- Auto Slice = Unity tries to detect boundaries.
- Manual Slice = You specify cell size or grid.
- Apply Changes:
- Click Apply in the top right of the Sprite Editor.
- Use Sprites in Your Game:
- Drag sliced sprites into the Scene.
- Use them in animations or as components in GameObjects.
Change the Pixels Per Unit of Sprite Sheet, from 100 to 16 in case the sprite is too small.
🎮 Add Sprite to the Scene
- Rename the existing
Ballsprite toPlayer. - Create an empty GameObject as a child of
Playerand name itAnimator. - Add a Sprite Renderer component to the
AnimatorGameObject. - Drag the first Warrior sprite from the asset pack into the Sprite Renderer’s Sprite field.
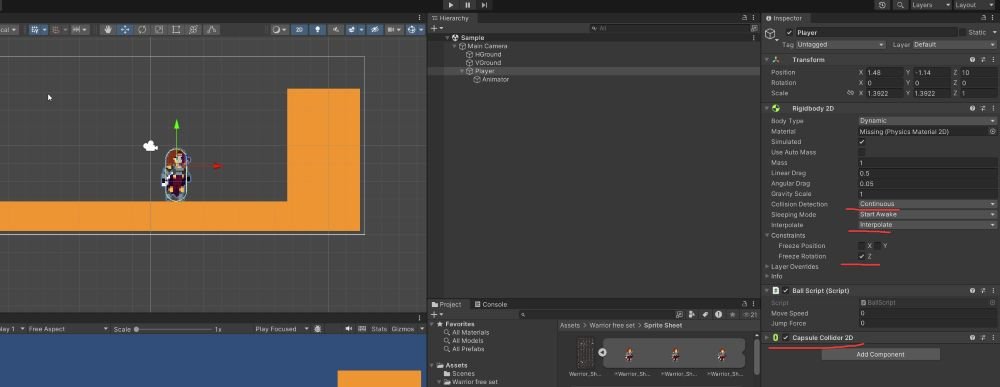
⚙️ Set Up Collider and Rigidbody for the Player
- Remove the existing Circle Collider 2D from the
PlayerGameObject. - Add a Capsule Collider 2D to the
Player. Adjust its size if needed to match the Warrior sprite. - In the Rigidbody 2D component of
Player, update the following properties:- Collision Detection → set to Continuous
- Interpolate → set to Interpolate
- Freeze Rotation → check the box for Z Axis
🎬 Add Animation to the Animator GameObject
- The imported Warrior asset already includes several animations and an Animator Controller.
- Assign the Warrior’s Animator Controller to the Animator GameObject by dragging it into the Controller field of the Animator component.
- Double-click the Animator Controller to open it in the Animator window.
- In the Animator window, click the Parameters tab and add a new Bool parameter named
IsRun.
🔁 Step 05: Add Transition Between Idle and Run
- Open the Animator window
Double-click the Animator Controller to open it (Window > Animation > Animator). - Verify Animation States
Make sure bothIdleandRunanimations are present as states in the Animator graph. - Create Transitions
- Right-click on the
Idlestate and select “Make Transition”, then click on theRunstate. - Do the same from
Runback toIdle.
- Right-click on the
- Set Transition Conditions
- Click the Idle → Run transition.
- In the Inspector, under Conditions, click the
+button. - Select the
IsRunparameter and set it to true. - For the Run → Idle transition, add the condition
IsRunequals false.
- (Optional) Tweak transition settings
You can adjust transition duration and exit time if needed for smoother switching.
Final Code:
using System.Collections;
using System.Collections.Generic;
using UnityEngine;

public class BallScript : MonoBehaviour
{

    private Rigidbody2D rb;
    private Animator playerAnim;

    [SerializeField] private float moveSpeed;
    [SerializeField] private float jumpForce;

    private float xInput;
    [SerializeField] private bool isRun;

    // Start is called before the first frame update
    void Start()
    {
        rb = GetComponent<Rigidbody2D>();
        playerAnim = GetComponentInChildren<Animator>();
    }

    // Update is called once per frame
    void Update()
    {
        // Get horizontal input
        xInput = Input.GetAxis("Horizontal");

        // Apply horizontal movement
        rb.velocity = new Vector2(xInput * moveSpeed, rb.velocity.y);


        // Jump on Space key press
        if (Input.GetKeyDown(KeyCode.Space))
        {
            rb.velocity = new Vector2(rb.velocity.x, jumpForce);
        }

        isRun = rb.velocity.x != 0;

        playerAnim.SetBool("IsRun", isRun);
    }
}
Troubleshooting
Issue 1: When use Package Manager to add the asset, got following error:
[Package Manager Window] Error while getting auth code: System.InvalidOperationException: Failed to call Unity ID to get auth code.
UnityEditor.AsyncHTTPClient:Done (UnityEditor.AsyncHTTPClient/State,int)
Issue 1 Solution: Open Unity Hub and sign in again. Restart Unity Editor afterward.
Related posts:
 Unity in Practice 0012 – Blend Tree in Unity
Unity in Practice 0014 – Unity 2D Dash and Dash Cooldown with Time.deltaTime
Unity in Practice 0011 – Player Jump with Ground Check in Unity
Unity in Practice 0010 – Flipping a 2D Character Horizontally in Unity
Unity Game Development – Systematic Learning Roadmap (2025 Edition)
Unity in Practice 0008 – Encapsulation and Inspector Access with Unity’s [SerializeField]
Unity in Practice 0003 – Unity Editor Windows and Tools
Unity in Practice 0007 – Very First Unity C# Code to Move and Jump a 2D Ball
Unity in Practice 0012 – Blend Tree in Unity
Unity in Practice 0014 – Unity 2D Dash and Dash Cooldown with Time.deltaTime
Unity in Practice 0011 – Player Jump with Ground Check in Unity
Unity in Practice 0010 – Flipping a 2D Character Horizontally in Unity
Unity Game Development – Systematic Learning Roadmap (2025 Edition)
Unity in Practice 0008 – Encapsulation and Inspector Access with Unity’s [SerializeField]
Unity in Practice 0003 – Unity Editor Windows and Tools
Unity in Practice 0007 – Very First Unity C# Code to Move and Jump a 2D Ball