Skip to content
AI & Software Engineering

Explore AI, AI Agents, software engineering, and the technologies shaping the future.

  • Home
  • AI & Agents
  • System Architecture
  • Project Management
  • Projects
  • Tutorials
  • Tech History
AI & Software Engineering

Explore AI, AI Agents, software engineering, and the technologies shaping the future.

Clone a WordPress with ASP.NET and React Part 1: Initialize Project Structure with AI

WCSee, May 30, 2025June 4, 2025

Set the Context for the AI Assistant

In the previous article Build a WordPress Clone with ASP.NET Core and React, I designed the project architecture with the help of AI. In this article, we start to initialize Project Structure with AI assistance.

Tools Used:
I’m using the Tae IDE along with Claude-4-Sonnect as my AI coding assistant.

First, I need to provide the AI assistant with enough context so it can generate meaningful and relevant output. The key requirements are:

  • It should understand the actual WordPress source code and its core functionalities.
  • It must be aware of the architecture we designed in the previous article.
  • Based on that, it should help generate a complete project and code structure using the ASP.NET Core + React stack.

The goal is to fully replicate the functionality of WordPress using modern technologies. I then prompt the AI as follows:

Prompt to AI:

Prompt:

Analyze the actual WordPress source code and its key functions. Based on that, and the architecture we designed earlier, generate a project and folder structure using ASP.NET Core for the backend and React for the frontend.

Please create the project and code structure directly in the current directory. The backend should follow a Visual Studio solution structure, aligned with WordPress functionality and the system architecture we've discussed.
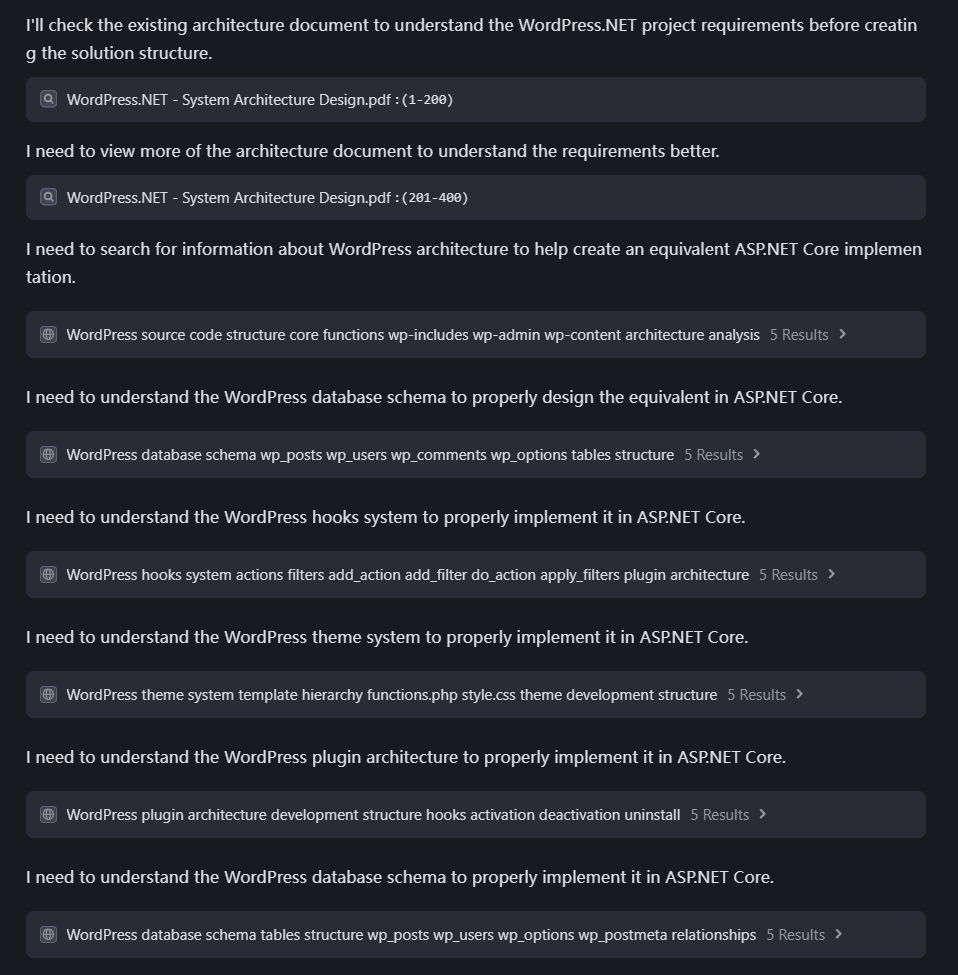
Initial Project Structure with AI

Project and Folder Structure By AI Assistant

Based on my analysis of WordPress architecture, I’ll create a comprehensive project structure for your WordPress.NET clone that incorporates the core concepts of WordPress into an ASP.NET Core and React implementation.

Understanding WordPress Architecture

Before diving into the implementation, let’s review the key WordPress components we’ll need to replicate:

  1. Hooks System : WordPress uses actions and filters to allow plugins and themes to modify core functionality 12
    • Actions: Allow code execution at specific points (do_action)
    • Filters: Allow data modification before rendering (apply_filters)
  2. Theme System : Follows a template hierarchy to determine which files to load 16
    • Template files (index.php, single.php, page.php, etc.)
    • Theme components (header.php, footer.php, sidebar.php)
    • functions.php for theme-specific functionality
  3. Plugin Architecture : Extends core functionality 21
    • Activation/deactivation hooks
    • Plugin API integration
    • Custom functionality injection
  4. Database Schema : Structured to store content, users, settings, and relationships 7
    • Posts and pages (wp_posts, wp_postmeta)
    • Users and roles (wp_users, wp_usermeta)
    • Options and settings (wp_options)
    • Taxonomies (wp_terms, wp_term_relationships, wp_term_taxonomy)

Overall Project Structure

Let’s create the following structure for your WordPress.NET clone:

wordpress-dotnet/
├── .gitignore
├── LICENSE
├── README.md
├── WordPress.NET - System Architecture Design.pdf
├── backend/
│   ├── WordPress.NET.sln
│   ├── src/
│   │   ├── WordPress.NET.Domain/
│   │   ├── WordPress.NET.Application/
│   │   ├── WordPress.NET.Infrastructure/
│   │   ├── WordPress.NET.API/
│   │   └── WordPress.NET.Shared/
│   └── tests/
│       ├── WordPress.NET.Domain.Tests/
│       ├── WordPress.NET.Application.Tests/
│       ├── WordPress.NET.Infrastructure.Tests/
│       └── WordPress.NET.API.Tests/
└── frontend/
    ├── public/
    └── src/
        ├── components/
        ├── hooks/
        ├── services/
        ├── store/
        ├── types/
        ├── utils/
        ├── styles/
        ├── assets/
        ├── pages/
        ├── routes/
        └── contexts/

Backend Implementation (ASP.NET Core)

Let’s start by creating the backend structure with the following projects:

1. WordPress.NET.Domain

This project will contain all domain entities that mirror WordPress’s database schema:

WordPress.NET.Domain/
├── Entities/
│   ├── Post.cs                 # Equivalent to wp_posts
│   ├── PostMeta.cs             # Equivalent to wp_postmeta
│   ├── User.cs                 # Equivalent to wp_users
│   ├── UserMeta.cs             # Equivalent to wp_usermeta
│   ├── Comment.cs              # Equivalent to wp_comments
│   ├── CommentMeta.cs          # Equivalent to wp_commentmeta
│   ├── Term.cs                 # Equivalent to wp_terms
│   ├── TermMeta.cs             # Equivalent to wp_termmeta
│   ├── TermRelationship.cs     # Equivalent to wp_term_relationships
│   ├── TermTaxonomy.cs         # Equivalent to wp_term_taxonomy
│   └── Option.cs               # Equivalent to wp_options
├── Enums/
│   ├── PostStatus.cs           # Published, Draft, etc.
│   ├── PostType.cs             # Post, Page, Attachment, etc.
│   └── CommentStatus.cs        # Approved, Pending, etc.
└── ValueObjects/
    └── PostContent.cs          # Content with formatting

2. WordPress.NET.Application

This project will contain application services, DTOs, and interfaces:

WordPress.NET.Application/
├── Common/
│   ├── Interfaces/
│   │   ├── IRepository.cs
│   │   └── IUnitOfWork.cs
│   └── Models/
│       ├── PaginatedList.cs
│       └── Result.cs
├── DTOs/
│   ├── PostDto.cs
│   ├── UserDto.cs
│   └── CommentDto.cs
├── Hooks/
│   ├── ActionManager.cs        # WordPress action hooks equivalent
│   ├── FilterManager.cs        # WordPress filter hooks equivalent
│   └── HookManager.cs          # Core hook functionality
├── Services/
│   ├── PostService.cs
│   ├── UserService.cs
│   ├── CommentService.cs
│   ├── TaxonomyService.cs
│   └── OptionService.cs
└── Interfaces/
    ├── IPostService.cs
    ├── IUserService.cs
    ├── ICommentService.cs
    ├── ITaxonomyService.cs
    └── IOptionService.cs

3. WordPress.NET.Infrastructure

This project will handle data access, external services, and persistence:

WordPress.NET.Infrastructure/
├── Data/
│   ├── ApplicationDbContext.cs
│   ├── Configurations/
│   │   ├── PostConfiguration.cs
│   │   ├── UserConfiguration.cs
│   │   └── CommentConfiguration.cs
│   ├── Migrations/
│   └── Repositories/
│       ├── PostRepository.cs
│       ├── UserRepository.cs
│       ├── CommentRepository.cs
│       ├── TaxonomyRepository.cs
│       └── OptionRepository.cs
├── Identity/
│   ├── IdentityService.cs
│   └── JwtTokenGenerator.cs
├── Plugins/
│   ├── PluginLoader.cs         # Plugin discovery and loading
│   └── PluginManager.cs        # Plugin activation/deactivation
└── Themes/
    ├── ThemeLoader.cs          # Theme discovery and loading
    └── ThemeManager.cs         # Theme activation/switching

4. WordPress.NET.API

This project will contain API controllers and configuration:

WordPress.NET.API/
├── Controllers/
│   ├── PostsController.cs      # Equivalent to wp-json/wp/v2/posts
│   ├── UsersController.cs      # Equivalent to wp-json/wp/v2/users
│   ├── CommentsController.cs   # Equivalent to wp-json/wp/v2/comments
│   ├── TaxonomiesController.cs # Equivalent to wp-json/wp/v2/taxonomies
│   └── OptionsController.cs    # Site settings and options
├── Filters/
│   └── ApiExceptionFilter.cs
├── Middleware/
│   ├── RequestLoggingMiddleware.cs
│   └── JwtMiddleware.cs
├── Program.cs
├── appsettings.json
└── appsettings.Development.json

5. WordPress.NET.Shared

This project will contain shared utilities and constants:

WordPress.NET.Shared/
├── Constants/
│   ├── ContentTypes.cs
│   └── Capabilities.cs
└── Extensions/
    ├── StringExtensions.cs
    └── DateTimeExtensions.cs

Frontend Implementation (React)

The frontend will be structured as follows:

frontend/
├── public/
│   ├── index.html
│   └── favicon.ico
├── src/
│   ├── components/
│   │   ├── common/
│   │   │   ├── Header.tsx
│   │   │   ├── Footer.tsx
│   │   │   └── Sidebar.tsx
│   │   ├── admin/
│   │   │   ├── Dashboard.tsx
│   │   │   ├── PostEditor.tsx
│   │   │   └── MediaLibrary.tsx
│   │   └── theme/
│   │       ├── PostList.tsx
│   │       ├── SinglePost.tsx
│   │       └── Page.tsx
│   ├── hooks/
│   │   ├── useAuth.ts
│   │   ├── usePosts.ts
│   │   └── useOptions.ts
│   ├── services/
│   │   ├── api.ts
│   │   ├── postService.ts
│   │   └── userService.ts
│   ├── store/
│   │   ├── index.ts
│   │   ├── authSlice.ts
│   │   └── postSlice.ts
│   ├── types/
│   │   ├── post.ts
│   │   ├── user.ts
│   │   └── comment.ts
│   ├── utils/
│   │   ├── formatDate.ts
│   │   └── sanitizeHtml.ts
│   ├── styles/
│   │   ├── global.css
│   │   └── theme.css
│   ├── pages/
│   │   ├── Home.tsx
│   │   ├── SinglePost.tsx
│   │   ├── Page.tsx
│   │   └── admin/
│   │       ├── Dashboard.tsx
│   │       ├── Posts.tsx
│   │       └── Settings.tsx
│   ├── routes/
│   │   ├── index.tsx
│   │   ├── publicRoutes.tsx
│   │   └── adminRoutes.tsx
│   ├── contexts/
│   │   └── ThemeContext.tsx
│   ├── App.tsx
│   ├── index.tsx
│   └── react-app-env.d.ts
├── package.json
├── tsconfig.json
└── .env

🔑 Key Tips

After reviewing the project structure generated by the AI assistant, it is highly recommended to save the output to a .md file. This serves as a reference for the AI in future steps, such as when generating specific folders or code files.

Also, avoid asking the AI to do too much in a single prompt. For example, instead of instructing it to generate the full project structure and create all folders/files at once, it’s better to follow a step-by-step approach:

  • First, ask the AI to generate the overall project structure.
  • Then, proceed to create folders and code files project by project.

This modular workflow improves clarity, reduces errors, and gives you better control over the development process.

Below is the prompt used to generate the overall project structure:

Prompt:

let's first create the project structure folders and WordPress.NET.sln file. according to ProjectStructure.md guide

✅ What’s Next?

In the next step, I’ll ask the AI assistant to help create folders and code files for each backend project one at a time, based on the structure we previously defined. For example, we’ll start with projects like WordPress.NET.Domain, and so on.

Github Repository

For more detail, please refer to the Project’s Github Repository: wcsee/wordpress-dotnet: Trying to clone WordPress with .NET stack

Please follow and like us:
RSS
Facebook
Facebook
fb-share-icon
X (Twitter)
Visit Us
Follow Me
Tweet
Pinterest
Pinterest
fb-share-icon
Post Views: 1,125

Related posts:

Clone a WordPress with ASP.NET and React Part 2: Create ASP.NET Projects Code Files with AI Clone a WordPress with ASP.NET Core and React: An AI-Assisted Development Journey Unity in Practice 0007 – Very First Unity C# Code to Move and Jump a 2D Ball How to Build a Website from Scratch (Step-by-Step Guide for Beginners) How to Check SSL/TLS Versions and Cipher Suites on macOS and Windows Set Up and Customize Website Using WordPress | Building Website Tutorials Part 4 Choose the Right Website Platform or Builder | Building Website Tutorials Part 2 Unity in Practice 0009 – How to Use Sprite Sheets in Unity for 2D Animation and UI
Tech Notes WordPress Clone

Post navigation

Previous post
Next post

Leave a Reply Cancel reply

Your email address will not be published. Required fields are marked *

Recent Posts

  • Chapter 5 — Major AI Agent Architecture Patterns
  • Chapter 4 — What Is an Agent Harness?
  • Chapter 3 — The Agent Loop: The Core Execution Cycle of an AI Agent
  • AI Agent Architecture and Engineering Practice Guide
  • Chapter 2 — LLM Application Architecture: Core Components and Engineering Foundations
  • Chapter 1: Rethinking AI Agents
  • The Key Milestones in the History of Artificial Intelligence (2026.08)
  • Building a Python-based AI Agent with LangGraph and OpenRouter: A Hands-On Guide
  • System Architecture Design: What Is It Really “Designing”? Understanding Through a Building Analogy
  • When Data Exceeds Memory: Choosing Between Pandas, Dask, and DuckDB for Efficient Analytics

Recent Comments

  • WCSee on Chapter 1: Rethinking AI Agents
  • WCSee on Chapter 2 — LLM Application Architecture: Core Components and Engineering Foundations
  • WCSee on AI Agent Architecture and Engineering Practice Guide
©2026 AI & Software Engineering | WordPress Theme by SuperbThemes
Manage Consent
To provide the best experiences, we use technologies like cookies to store and/or access device information. Consenting to these technologies will allow us to process data such as browsing behavior or unique IDs on this site. Not consenting or withdrawing consent, may adversely affect certain features and functions.
Functional Always active
The technical storage or access is strictly necessary for the legitimate purpose of enabling the use of a specific service explicitly requested by the subscriber or user, or for the sole purpose of carrying out the transmission of a communication over an electronic communications network.
Preferences
The technical storage or access is necessary for the legitimate purpose of storing preferences that are not requested by the subscriber or user.
Statistics
The technical storage or access that is used exclusively for statistical purposes. The technical storage or access that is used exclusively for anonymous statistical purposes. Without a subpoena, voluntary compliance on the part of your Internet Service Provider, or additional records from a third party, information stored or retrieved for this purpose alone cannot usually be used to identify you.
Marketing
The technical storage or access is required to create user profiles to send advertising, or to track the user on a website or across several websites for similar marketing purposes.
  • Manage options
  • Manage services
  • Manage {vendor_count} vendors
  • Read more about these purposes
View preferences
  • {title}
  • {title}
  • {title}