This tutorial walks you through creating a simple Unity project where a 2D ball can move left/right and jump using keyboard input. It’s perfect for beginners who want to learn how to work with physics, input detection, and scripting in Unity.
🔄 What You’ll Build
- A 2D ball that moves left/right using the A/D or arrow keys.
- Pressing Space makes the ball jump upward.
- The movement and jump behavior are handled in a custom C# script.
🎨 Step 1 – Create Your Scene
- Create a 2D Sprite for the Ball:
- In the Unity Hierarchy, right-click →
2D Object→Sprite→ Circle, then name itBall. - Add a
Rigidbody2Dand aCircleCollider2Dcomponent to the Ball.
- In the Unity Hierarchy, right-click →
- Create 2 Ground:
- Right-click →
2D Object→Sprite→ Square, then name it VGround and HGround. - Stretch it wide at the bottom of the scene.
- Add a
BoxCollider2Dto make it solid.
- Right-click →
refer previous article for detail: Unity in Practice 0004 – Unity Rigidbody – Wonderful Code See
💻 Step 2 – Write the Movement and Jump Script
- Create a new C# script:
BallScript.cs - Attach it to the
BallGameObject. - Code:
using System.Collections;
using System.Collections.Generic;
using UnityEngine;
public class BallScript : MonoBehaviour
{
public Rigidbody2D rb;
public float moveSpeed;
public float jumpForce;
private float xInput;
// Start is called before the first frame update
void Start()
{
}
// Update is called once per frame
void Update()
{
// Get horizontal input
xInput = Input.GetAxis("Horizontal");
// Apply horizontal movement
rb.velocity = new Vector2(xInput * moveSpeed, rb.velocity.y);
// Jump on Space key press
if (Input.GetKeyDown(KeyCode.Space))
{
rb.velocity = new Vector2(rb.velocity.x, jumpForce);
}
}
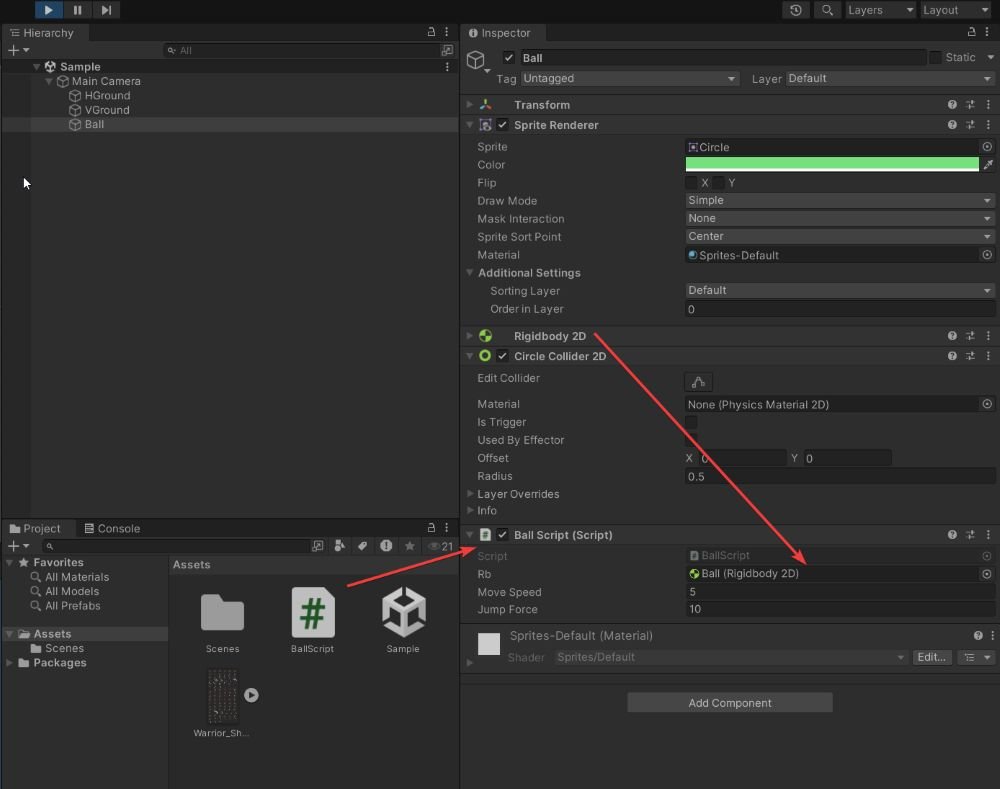
}🛠 Step 3 – Set Up References in the Inspector
- Drag the
BallGameObject into therbfield.
▶️ Step 4 – Run the Scene
- Press the Play button.
- Use the keyboard:
- Press A/D or ←/→ to move the ball left and right.
- Press Space to jump when the ball is on the ground.
✅ Summary
You now have a basic but functional 2D movement and jumping system. This is a great starting point for platformers, side-scrolling games, or physics experiments.
🧠 Advance:Line-by-Line Detail Explanation:
xInput = Input.GetAxis("Horizontal");- Purpose: Reads the player’s horizontal movement input.
- How it works:
- Unity’s built-in
"Horizontal"axis maps:Aor←: returns -1Dor→: returns +1- No key pressed : returns 0
- It also applies smoothing for gradual acceleration/deceleration.
- Unity’s built-in
- Result:
xInputbecomes a float value between -1 and 1, indicating the direction and intensity of horizontal input.
rb.velocity = new Vector2(xInput * moveSpeed, rb.velocity.y);- Purpose: Moves the ball horizontally.
- Explanation:
rbrefers to the Rigidbody2D component attached to the GameObject.rb.velocitysets the object’s current velocity.new Vector2(...)creates a 2D velocity vector.
- Details:
xInput * moveSpeeddetermines the speed along the X-axis.- For example, if
xInput = 1andmoveSpeed = 5, the velocity becomes 5 to the right.
- For example, if
rb.velocity.ypreserves the current Y-axis velocity (such as jumping or gravity).
- Result: The ball moves left/right based on input, without affecting vertical movement.
if (Input.GetKeyDown(KeyCode.Space))- Purpose: Detects if the Space key was just pressed.
- Difference:
GetKeyDown: Returnstrueonly on the frame the key is initially pressed.GetKey: Returnstrueevery frame the key is held down.GetKeyUp: Returnstruewhen the key is released.
- Use Case: Ideal for triggering a jump only once per press.
rb.velocity = new Vector2(rb.velocity.x, jumpForce);- Purpose: Makes the ball jump by applying upward velocity.
- Explanation:
rb.velocity.xkeeps the existing horizontal movement.jumpForce(usually a positive number) sets the jump height.- This line overrides the Y velocity, making the object jump instantly.
- Note: This code does not check if the object is on the ground, so it allows infinite jumping in mid-air. To fix this, ground-check logic is needed.
Please follow and like us:
Related posts:
 Unity in Practice 0012 – Blend Tree in Unity
Unity in Practice 0014 – Unity 2D Dash and Dash Cooldown with Time.deltaTime
Unity in Practice 0011 – Player Jump with Ground Check in Unity
Unity in Practice 0010 – Flipping a 2D Character Horizontally in Unity
Unity in Practice 0009 – How to Use Sprite Sheets in Unity for 2D Animation and UI
Unity in Practice 0008 – Encapsulation and Inspector Access with Unity’s [SerializeField]
Unity in Practice 0004 – Unity Rigidbody
Unity Game Development – Systematic Learning Roadmap (2025 Edition)
Unity in Practice 0012 – Blend Tree in Unity
Unity in Practice 0014 – Unity 2D Dash and Dash Cooldown with Time.deltaTime
Unity in Practice 0011 – Player Jump with Ground Check in Unity
Unity in Practice 0010 – Flipping a 2D Character Horizontally in Unity
Unity in Practice 0009 – How to Use Sprite Sheets in Unity for 2D Animation and UI
Unity in Practice 0008 – Encapsulation and Inspector Access with Unity’s [SerializeField]
Unity in Practice 0004 – Unity Rigidbody
Unity Game Development – Systematic Learning Roadmap (2025 Edition)